Showing posts with label Tutorial. Show all posts

Tuesday, November 15, 2016

Crafting Live and a Poppy Tutorial for The Royal British Legion


Last weekend I had an Artisan Stall at the Crafting Live Event in Peterborough, that offered two days of Crafting with all proceeds from door entry, going to The Royal British Legion. 

The idea of the Artisan Stall was to share ready made up items for sale, so I'd spent the past week solidly making up things to share and sell on my Stall. 
I hadn't even had time to unpack from Onstage and go through my swaps to share with you, which I will do this week.

The day started early and I was positioned with some very talented crafters sat at their stalls. At 9.30am when the doors opened to the public, I started to meet some wonderful people ... two of which were members of my own fabulous Team, The Stampin' STYlettes. 


Allison and Fiona don't live far away, so popped in to see me and offer a friendly smile. Mind you ... the day didn't go without plenty more smiles and lots of chat with some lovely crafting ladies ... and gents. I so love the interaction with others, meeting people from all over the country, who had travelled far and wide to visit. Some were new to crafting, others well established, but all very friendly and complimentary of my stall. 


Be it that the event was supporting The Royal British Legion, I had decided to make up more of these Table Favours that I'd been giving in this month's classes. I offered them out for a small donation to the Charity. The Poppy disguised a wrapped Mint Chocolate Biscuit and were well received. 

I had posted these on my personal Facebook page and received an abundance of private messages, asking for how I made them, so decided to share some very basic instructions. 


You'd be amazed at just how simple they are to make ... just a formation of circles, ovals and a leaf. You might like to keep these instructions for next year. 


  1. Cut Two Ovals of differing sizes and stamp using Kinda Eclectic sunburst image in the same Real Red as the cardstock.
  2. Curl the edges using a bone folder (I have kept them flat here for the purpose of the photo). Snip into the centre where they over lap and interlock. 
  3. Die cut the leaf from the Leaflets Framelits in Garden Green. 
  4. Mount the poppy on a disc of Basic Black and sandwich your treat between that and another disc. Add the leaf and then the poppy head, before finishing it off with a smaller circle of Black Cardstock to the centre, which I've adhered using a single Dimensional foam pad. 
At one point in the day, I was asked if I wouldn't mind doing a presentation for the Crafting Live Team to record. Gulp! ... I hadn't gone prepared for this, but did have a spot of colouring to hand, from the previous night's class. I was expecting for the Artisan Stall to be located in a very different area, so hadn't planned my usual Make & Take, but when I found myself in the main Arena, right opposite the Make & Take station, I wish I had.    

So ... with Blender pen in hand, an Acrylic block and some Marker Pens, I set to doing a 3 minute presentation on using Blender Pens, in a rather nervous manner in front of two Cameras. Oh there was so much I felt I could/should have said afterwards, but nerves took the better of me ... 


... and these Merry little Mice were what I was colouring in. 


If I had the pleasure of meeting you at the weekend, then thank you for visiting my stall, it was a true pleasure to meet everyone that I met, to share my love for what I do. The Prize Draw I was running was drawn the next morning and the lucky winner contacted ... so Congratulations Barbara Walker ... Your goodies will be heading your way this week and I hope you will enjoy playing with them. 

I will share some more of my makes over the coming week as the build up to Christmas really kicks in. 


Sunday, August 2, 2015

Mini Album Tutorial

Yesterday was the Stampin' Creative Blog Hop, where the theme was Summer Lovin' and I produced a mini album made with the Envelope Punch Board.

I have received many requests as to how I made the base for this album, so here I detail, as best I can, a mini tutorial on how to assemble the base for this project. 


First of all you will need an Envelope Punch board to create 4 envelopes. Following the instructions on the EPB, I used card stock cut to size and the instructions for cards of 6" x 6" in size. The sizes and score lines can be found on the front of your Envelope Punch Board for this. This is the size that I made, but you could size up or down using the instructions on the board and following these steps. I originally used Cardstock, but here have chosen to explain using Envelope paper.

Once you have your four Envelopes, you need to take two to start with and with them sat side by side, interlock the adjacent flaps as shown here.


You can either adhere flat the outside flaps and the overlapping points in the middle of each envelope now or return to this later when you are sure you are happy with it's assembly.


Close these first two envelopes together like a book and you will see that you have a loose flap to the back.

Fold this back on itself. Below you are now looking at the front of the left envelope (as if the front of the book), with the outside flap folded from the back forwards. 


This will reveal an opening down the spine, where you need to slot in the next envelope as shown here. 


You will be adhering down the left flap flat within and the bottom flap over the top at the central overlapping point, but again, this can all be done at the end.

Slot in your final envelope in a similar fashion, slotting it into the spine, so that you have a flat front and back and all envelope flaps are internal. You will then need to find these loose internal flaps to adhere down NOTE: the top and bottom flaps of each page should only be adhered together at the centre overlapping point if you want the page to have a pocket.


Cut cardstock to 6 1/4" square to overlay the exposed envelope flaps and deciding if you want to keep the side open to create a pocket, apply adhesive sticky strip to three for four sides and adhere. Keep the outside edge open for storing extra photographs, tickets and suchlike by only applying adhesive to the centre, top and bottom sides. Repeat for each page.

You now need to make the spine binding. 

Cut your chosen cardstock to 6 1/4" x 2 1/2". Scoring down the length of the card stock at 3/4", 1", 1 1/2", 1 3/4". Burnish the creases into your book binder and adhere the front and back flaps to the front and back of the album. 


You are now ready to embellish your album as you choose to store your cherished memories.


I hope this makes sense and you enjoy making yours as much as I did mine. If you don't have an Envelope Punch Board, then you could make one simply using large square envelopes as a base for your pages. 

Happy Crafting

Mikaela x

Built for Free Using: My Stampin Blog

Saturday, August 1, 2015

Stampin' Creative Blog Hop - Summer Lovin'

Welcome to the monthly blog hop of the Stampin' Creative girls and this month the theme is Summer Lovin'

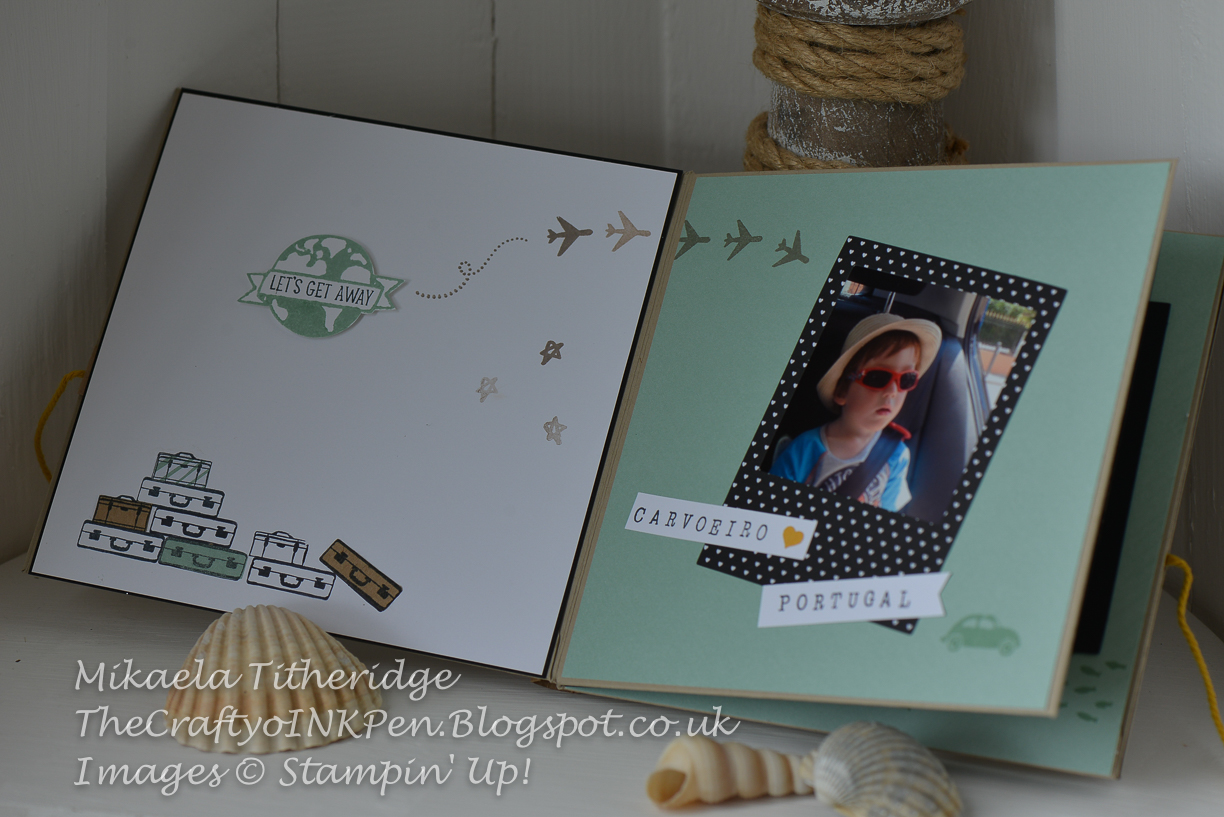
School holidays have started and it's the time when holiday fun begins … Having recently returned home from a fun family holiday to Portugal, I thought I'd make something different for you this month to capture just a snippet of that holiday. 

Scrapbooking and journaling our photographs has become a big craze and although Stampin' Up! have Project Life by Stampin' Up!, I thought I'd make something of my own, using some Cardstock and the Envelope Punch Board.


Can you believe that just four envelopes and some matting card stock helped to create this mini album.

It really is just a snippet of our holiday, but a few memories all the same.


All too often now a days, our photographs remain on our digital devices and barely get looked at, which is why so many now tend to print them off and keep them in Memory albums.

Project Life by Stampin' Up! is a fantastically quick way to scrapbook your memories. No big pages to create, just smaller, more manageable elements, that make it perfect for those lacking in time. Well this may not be an official album, but it's my Mini Album and it only took an afternoon to create.


Believe me, we didn't take this many suitcases … in fact, we thankfully still manage with just two between the three of us, although I'm beginning to wonder if things will change next year, with a rapidly growing son. These are from the stamp set PL Lets Get Away, which I've used throughout.


Can I just say … I have NEVER scrapbooked in my life, but found this incredibly easy and most enjoyable to make and decorate. Perhaps because the 6" x 6" pages aren't particularly big to decorate and the various elements from the Hello Life Project Kit are so usable for this kind of project. You'll see more of this set used throughout. 


Awww this was sleeping beauty upon our arrival at the Villa. He was insistent on wearing his new holiday sun hat and sunglasses for the entire 1 hour journey from the airport to Carvoeiro.

To help avoid bulk with the matting of the pages, I have used the plain side of the new Envelope Paper here, which is much thinner. I so love Mint Macaron!


This is a child, who until last year's holiday, didn't like Ice Cream or Ice Lollies … Well, he couldn't get enough of them this year.

I love how the colour of the plant in the background, coordinated so beautifully with the Crushed Curry colour of the photo frame. 


The only thing the stamp set was missing was Fish and our memory of the beach was just that … oh, along with a black crab, the first that Bertie had ever seen. This photograph was taken from the open window of the restaurant that we were eating in. They served the most fabulous fresh fish.


Other than the word 'Happy' on the front page, which I die cut using the Hello You Thinlits, the lettering throughout this album, was creating using the ever so versatile Alphabet Rotary Stamp. It meant that I could literally choose whatever wording I wanted and really personalise it. Great for using up scraps too! 

The various banners were again, taken from the Hello Life Project Kit. There are so many elements in that kit that you could create a multitude of things using it … and I just love the photo frames that I've used throughout.


For those of you who know me well, you'll know that my family mean the world to me, so to be surrounded by hearts was a must for this page. Enjoying the evening sun after an enjoyable meal in our favourite restaurant and day trips out exploring …. and that random, one off family photo of us all together. That seldom happens with hubby usually being behind the camera.


I wanted to leave this final page as plain as possible, leaving space for some journaling from the holiday. I loved the bird stamp … it reminded me of the birds to the top of my blog here. 

Well there you are … a snapshot of our holiday, all wrapped up in an enjoyable afternoon's worth of mini album making … and with pockets created behind each overlay, there's still plenty of space to add more memories … Tickets, more photo's, Postcards etc.

Now, lets see what wonderful project Louise has created for her Summer Lovin' post.

Enjoy the rest of your hopping and the rest of the holidays … and remember to cherish those moments and don't let them get forgotten on your digital devices.


Mikaela x


Running order:
Lesley - http://lellyjellys.blogspot.co.uk/2015/08/stampin-creative-blog-hop-summer-lovin.html
Emma - http://www.coastalcrafter.com
Eimear - http://stampincolour.com/stampin-creative-july-blog-hop-summer-lovin


Built for Free Using: My Stampin Blog

Monday, June 1, 2015

Sprinkles of Life Slider Card Tutorial

A couple of days ago I posted my creations for the Stampin' Creative Blog Hop that I take part in every month. 

The slider card that I made, using the new Envelope Paper and the Ronald McDonald House Charities Stamp Set, Sprinkles of Life, received a lot of interest as to how it was made. Between my Blog and Facebook, I have been asked by many people for a Tutorial. 

Now, I could just give you the instructions on how to make that very one, or I could give you a variation using the same stamp set …. so I opted for the latter. 


I decided to use more of the Build a Tree Punch and switched the base colour of the card from Watermelon Wonder, to Tip Top Taupe (I LOVE this colour … and it's name).

If you didn't see my former post showing the Cupcake version, then you'll find it HERE, but the instructions to make it are the same.

Tutorial:

Tip Top Taupe:    5 1/2" x 8 1/4"   Scored at 4" and 8"
Envelope Paper:  3 1/2" x 5"
Whisper White:   3 3/4" x 5"  and 3 1/4" x 3/4"


Burnish the score lines and with the 1/4" strip to the right, adhere your patterned paper to the right panel, before using a 1 1/4" circle punch to punch out a semi circle to the top.

You now need to create a vertical cut one inch to the left of the 8" score line and the narrow tab. This cut should start 1" down and end 1" up from the bottom. 


Place a couple of Dimensional foam pads to one end of the thin strip of Whisper White card stock and tuck it into the slot.


Turning it over, ensure that the White strip is to the very bottom of the slot and pushed right in, so that the Dimensionals are sitting flush to the edge of the slot. Apply Sticky Strip adhesive to the reverse side. 

Adhere the remaining piece of Whisper White card stock to this strip, by lining it up between the two score lines and ensuring it is flush with the top edge of the outer pocket. 


Applying adhesive to the long 1/4" tab, you can now seal up the slider pocket. 

Pull the inserted card up and stamp your chosen images or sentiments, ensuring that they will line up, if necessary. with the topper (as I did with the Candle and the Cupcake).

Layer some card stock banners and using Fast Fuse, attach the base of the tree. To help lift the weight of the tree canopy, I have placed a Dimensional behind the lower part of the canopy, (without removing the Dimensional cover). This will help it to slide up and down the card. You need to ensure that it doesn't get caught at the top as you raise the card up.


Attach your topper to the Dimensionals of the strip in the slider slot and attach some ribbon to the top of your card. Your creation is now complete.


I hope you find this Tutorial easy to follow and useful and that you enjoy making yours as much as I have done mine. 

Off to finish preparing my order for the New Catalogue launching in about 4 hours …. yes, more gorgeous new products like these. 

Happy Crafting

Mikaela x