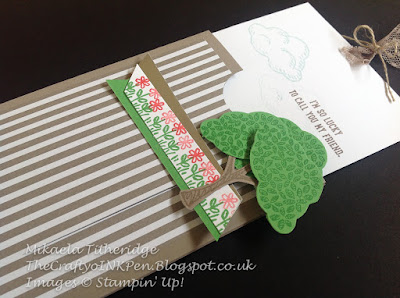
The slider card that I made, using the new Envelope Paper and the Ronald McDonald House Charities Stamp Set, Sprinkles of Life, received a lot of interest as to how it was made. Between my Blog and Facebook, I have been asked by many people for a Tutorial.
Now, I could just give you the instructions on how to make that very one, or I could give you a variation using the same stamp set …. so I opted for the latter.
I decided to use more of the Build a Tree Punch and switched the base colour of the card from Watermelon Wonder, to Tip Top Taupe (I LOVE this colour … and it's name).
If you didn't see my former post showing the Cupcake version, then you'll find it HERE, but the instructions to make it are the same.
Tutorial:
Tip Top Taupe: 5 1/2" x 8 1/4" Scored at 4" and 8"
Envelope Paper: 3 1/2" x 5"
Whisper White: 3 3/4" x 5" and 3 1/4" x 3/4"
Burnish the score lines and with the 1/4" strip to the right, adhere your patterned paper to the right panel, before using a 1 1/4" circle punch to punch out a semi circle to the top.
You now need to create a vertical cut one inch to the left of the 8" score line and the narrow tab. This cut should start 1" down and end 1" up from the bottom.
Place a couple of Dimensional foam pads to one end of the thin strip of Whisper White card stock and tuck it into the slot.
Turning it over, ensure that the White strip is to the very bottom of the slot and pushed right in, so that the Dimensionals are sitting flush to the edge of the slot. Apply Sticky Strip adhesive to the reverse side.
Adhere the remaining piece of Whisper White card stock to this strip, by lining it up between the two score lines and ensuring it is flush with the top edge of the outer pocket.
Applying adhesive to the long 1/4" tab, you can now seal up the slider pocket.
Pull the inserted card up and stamp your chosen images or sentiments, ensuring that they will line up, if necessary. with the topper (as I did with the Candle and the Cupcake).
Layer some card stock banners and using Fast Fuse, attach the base of the tree. To help lift the weight of the tree canopy, I have placed a Dimensional behind the lower part of the canopy, (without removing the Dimensional cover). This will help it to slide up and down the card. You need to ensure that it doesn't get caught at the top as you raise the card up.
Attach your topper to the Dimensionals of the strip in the slider slot and attach some ribbon to the top of your card. Your creation is now complete.
I hope you find this Tutorial easy to follow and useful and that you enjoy making yours as much as I have done mine.
Off to finish preparing my order for the New Catalogue launching in about 4 hours …. yes, more gorgeous new products like these.
Happy Crafting
Mikaela x


I like that :)
ReplyDeleteaww thank you Helge and thank you for leaving a comment to tell me so, that's much appreciated x
ReplyDeleteMikaela I like this card and tutorial so much, that I have made it for my little nephews birthday. So thank you for all of this. I don't know how to enter a picture of it, but you can visit my blog: http://hennyhaarhoekje.blogspot.nl/2015/06/steff-4-jaar.html. I also mentioned your blog on the Dutch Pinky's Facebook. :)
ReplyDeleteKind regards,
HennyB:)
Oh Thank you so much Henny for sharing your version of this card with me. It's lovely to see how others have used this tutorial and thank you for tagging me into your blog for others to enjoy making it too. Inspire, Create, Share xx
ReplyDelete