
I have teamed up with 11 Incredible Demonstrators from around the globe to bring you a Tutorial Bundle, once a month for a 6 month period (August 2016 - January 2017).
All tutorials are offered in both Metric and Imperial measurements so that everyone around the globe are able to recreate the projects with ease.
You will receive no less than TWELVE tutorials in each month's Tutorial Bundle, one tutorial from each of the twelve designers.

For a sneak peek of each month's Tutorials and/or to purchase them click below.

Poppy Favour Tutorial


- Cut Two Ovals of differing sizes and stamp using Kinda Eclectic sunburst image in the same Real Red as the cardstock.
- Curl the edges using a bone folder (I have kept them flat here for the purpose of the photo). Snip into the centre where they over lap and interlock.
- Die cut the leaf from the Leaflets Framelits in Garden Green.
- Mount the poppy on a disc of Basic Black and sandwich your treat between that and another disc. Add the leaf and then the poppy head, before finishing it off with a smaller circle of Black Cardstock to the centre, which I've adhered using a single Dimensional foam pad.
Notecard and Tag Gift Box for 3"x3" cards

Click on the above photo to see the project post in it's entirety. Below are the instructions for making the box and insert divider.
The enclosed Notecards are a simple 3" x 3" square card and the coordinating Envelopes were made using the Envelope Punch Board and Designer Series Paper. The tags are cut to 2" wide, finished using the Tag Topper Punch and cut to your chosen length to fit the box. Stamp up the cards to coordinate with your chosen DSP.

Snip into one score line at each corner and use a strong adhesive to assemble. I have shown here with Sticky Strip so that you are able to see it clearly.

It is a good idea to adhere the divider in place. This helps to give the box a little more strength to the base.
If you are stamping on the Box Lid, you will want to do this before assembling.

Wonderland Hanging Star Ornament Tutorial (6" x 6")
Click on the photo, to be taken to the Tutorial Instructions.

Envelope Punch Board Mini Album (6" x 6")
Click on the photo, to be taken to the Tutorial Instructions.

Envelope Punch Board/Paper Table Favour
Click on the photo, to be taken to the Tutorial Instructions.
The instructions will yield 12 favours from one sheet of 12" x 12" paper. Instructions require a 3" square piece for this size.

Sprinkles of Life Slider Card
Click on the first photo to be taken to the Photographic Tutorial instructions.


Gift Card Envelope Box Tutorial
Click on the photo to be taken to the Tutorial instructions.

Santa's Face Embellishment Tutorial
I have received some lovely comments and emails asking for instructions on how to make the Punch Art Santa that I showed on my Curvy Keepsake Gift Boxes of late, so without further ado ….. get your punches ready and spread a little cheer!

You will need the following punches and dies:
2 3/8" Scallop Circle - White
1 3/4" Scallop Circle - White
Large Oval - Blushing Bride
Large circle from Owl Builder Punch - Blushing Bride
2 Medium Circles from Owl Builder Punch - Black
Mustache Framelit - White
Petite Pennants Builder - Real Red
Petite Pennants Builder - Silver Glimmer (part punch)
1/2" Circle - Silver Glimmer
1. Punch out one each of the above (unless otherwise stated)
2. Assemble as shown. Taking the Pennant Parade part punch of glimmer paper and holding with a post it note, re-insert into the punch in the opposite direction to add a scalloped edge to the opposite side of the scalloped bottom edge.
3. Add the Mustache to the face using Dimensionals and add the scalloped punched glimmer strip to the bottom of the hat.
4. Attach the hat to the face and decide where you wish to use your cheerful Santa.
Merry Christmas
Mikaela x

Curvy Keepsake Pumpkin Box Tutorial
Place an online order with me during the month of October 2014, of £20 or more, and you will receive a kit to make two of these cute boxes. Look out for the Hostess Code to apply to your order at the beginning of October (Note that the Designer Series Paper may differ to that shown here).
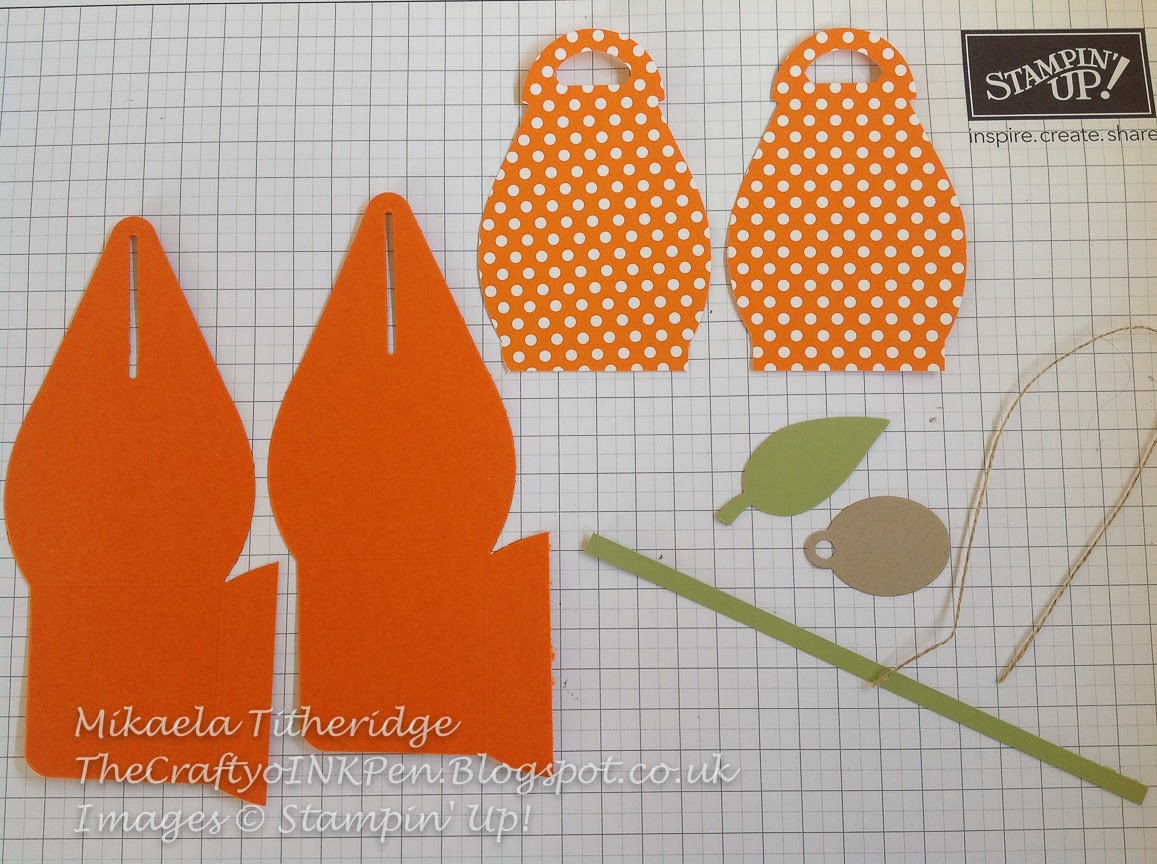
Cut two each of the Cardstock sides and two of the Polka Dot Designer Series Paper sides. Please note that this particular DSP has been retired, but the Designer Series paper Stacks would offer a similar polka dot.

Die cut as shown here.

Fold on the score lines and lay out as shown here.

Adhere the cardstock base together, then trim off the excess DSP along the scoreline at the base of the sides.

Add adhesive to the outside edge of the little side tab of the card stock base and marry up the base of the DSP side. Repeat on both sides.

The base of your box will now look like this.

Very gently, using the full length of a Bone Folder, curl each box side inwards on itself, in the direction of it being assembled.

The Curvy Keepsake Box Thinlits, comes complete with 3 possible tags. I've used the oval here and stamped using a Hostess Set called, Good Greetings.

The leaf has been die cut using the Autumn Accents Die. Take a thin strip of matching card stock and wrap it tightly around a thin round pen or similar.

Layer the tag and leaf, attach the card stock curl with a Glue Dot and tie to the box using Linen Thread.


Should you purchase the gorgeous Flower Shop Stamp Set and Punch Bundle, then you will find this tip for setting up the stamps, very useful.
Thankfully, I discovered this tip from one of my fellow Demonstrators in America, before setting my kit up. There is only one way that the punch will fit neatly around the stamped image, with an even edge all the way round, so you need to find this to start with … and here is how.

Firstly you want to take a piece of cardstock and pushing the strip right down into the punch, punch out the image. Turn the piece of cardstock over and mark which is the top and bottom of the image (the bottom being the inside edge of the punch). It is important to turn the cardstock over to mark this, as you are wanting the punch to sit the way the image will appear when stamped.
Now place each flower image in turn onto your acrylic block and with the punched out flower, sit it over the rubber image, turning it until it sits snuggly around the flower (there really is only one best way). When you've found it, mark on the edge of the rubber, where the bottom is (as shown in the bottom left photo here). Repeat for each flower image.
I have marked the bottom, so that now when I stamp the image, I stamp it with the bottom mark of the image to the edge of the cardstock, so that I can slot it directly into the punch, without having to cut away excess cardstock to line it up. I have also marked the rubber that I store them in, so that I know which way round it sits neatly back in the case.
I hope this makes sense. I think once you start rotating the cardstock, you'll see how it fits better one way more so than the others.
Telford Regional Training Day - 11 May 2013
FREE Swap Tutorial

Supplies needed:
Cardstock
Pool Party, Wisteria Wonder, Calypso Coral, Crumb Cake, Whisper White, Lucky Limeade
Inks
Whisper White, Basic Grey, Crumb Cake, Early Espresso
Tools, Punches and Stamp Sets
Two Tags Bigz Die, Ticket Duo Builder, Itty Bitty Shapes Punch pack, 1 3/4 or 2 3/8 Scallop Circle Punch, Jewelry Tag Punch, Bird Builder Punch, Beautiful Wings Embosslits, Made for you Stamp Set, Woodgrain
Accessories
Dimensionals, Snail Adhesive, Glue Dots, Natural Trim Ribbon, Linen Thread
Step by Step Instructions

- Take a scrap of cardstock with a part punched scallop circle and with Whisper White Ink, sponge the ink along the inside edge of the scallop, onto your Pool Party Tag, to create a cloud effect. Repeat over the top part of the tag until you get your desired sky look. Note: You can use either the 1 3/4" or 2 3/8" Scallop Circle.

- Stamp the Woodgrain image, using Basic Grey Ink, onto long strips of 6 cm deep Whisper White Cardstock (Stamp off and use Second Edition Stamp technique for a lighter Grey) Note: If you are only making one tag, the cardstock will need to be 6 x 7.2cm
- Cut cardstock into strips of 0.9 x 6 cm ... you need 8. Slide the tip of each strip of cardstock (except one) into the Jewelry Tag Punch (as shown above) only punching one end
- Stick the unpunched strip along the top edge of the 7.5 x 5cm piece of Lucky Limeade Cardstock and then the punched slats, to create the picket fence
- When you've completed your fence, trim excess wooden slats along the bottom if needed and run back through the big shot, using the Two Tags Bigz Die, to create the bottom edge of the tag

- Adhere dimensionals to the back of the fence and create two vertical lines of 3 dimensionals on the Tag, from just below the score line upwards, where you want your flowers to sit. Using the excess side strips of your dimensionals, add a height to one stem
- Using the Itty Bitty Punch Set, punch a LOT of flowers out of Wisteria Wonder cardstock and crumple between your fingers (you can do several at a time), before attaching the screwed up flowers to each dimensional line, until covered
- Add the Calypso Coral Butterfly and the leaves using Glue Dots

- Attach the fence to the main tag, lining up the bottom edge and tucking the leaves between the fence posts
- Using the Woodgrain Stamp, Crumb Cake Ink and the Second Edition Stamping technique, stamp strips of Crumb Cake Card Stock
- Print your chosen sentiment with Early Espresso Ink and punch out using the Ticket Duo Builder, before adding this with Snail adhesive to the fence
- Slot your ribbon through the curved cut at the top of the tag and secure with a bow of Linen Thread
Enjoy making and creating your own versions!
Happy Crafting x
No comments:
New comments are not allowed.